Only workspace admins can use this feature.
Choosing identity providers
To access your SSO settings, click on your profile icon located at the bottom left of the dashboard, select Workspace Settings, and then navigate to the SECURITY & SSO tab. You can choose from a variety of identity providers, including Google, Okta, GitHub, etc. The organization SSO provider will only appear in this list after it has been configured shown in theConfigure SSO section.
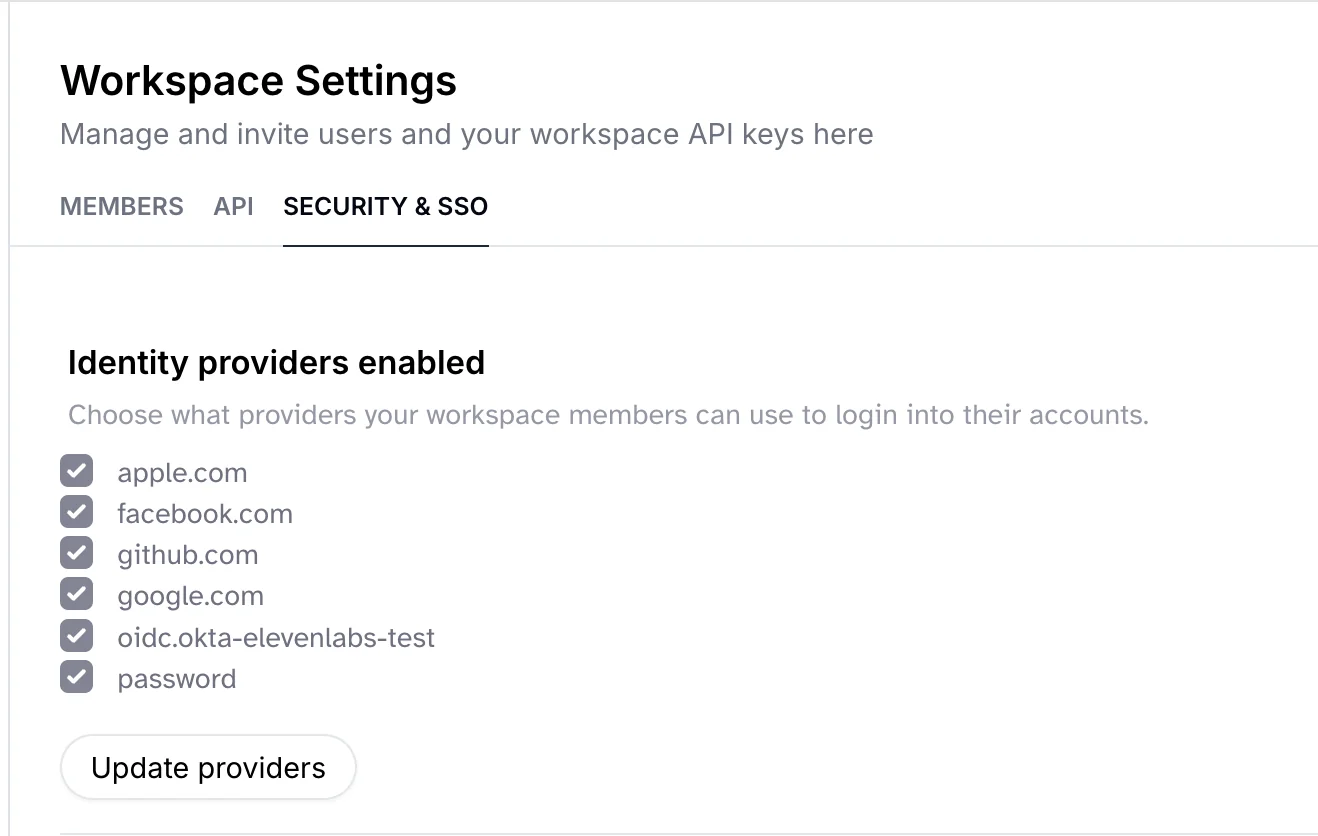 If you disable any of the identity providers, your team members will log out if they’re using the disabled providers. They will be able to log back into the same account with any of the allowed providers if they are using the same email.
Verifying your email domain
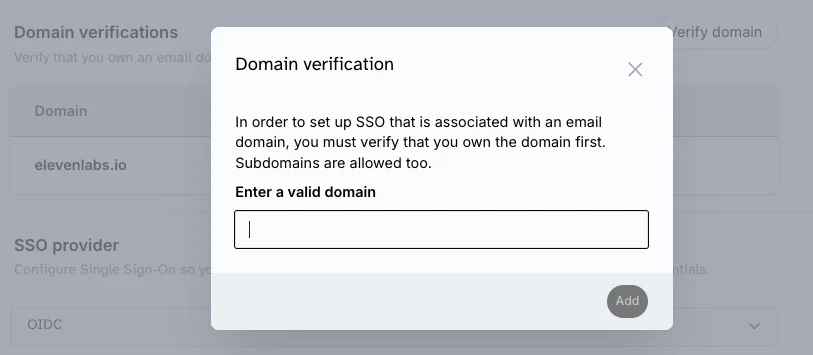
Next, you need to verify your email domain for authentication. This step confirms to ElevenLabs that you own the domain you are configuring for SSO. This is a security measure to prevent unauthorized access to your workspace.- Click on the
Verify domainbutton.

- Enter the domain name you want to verify.
- You’ll be prompted to add a DNS TXT record to the DNS settings of your domain. An example text is as below. You can contact your domain administrator or IT team for help with this step. Once the DNS record is added, click on the
Verifybutton again.
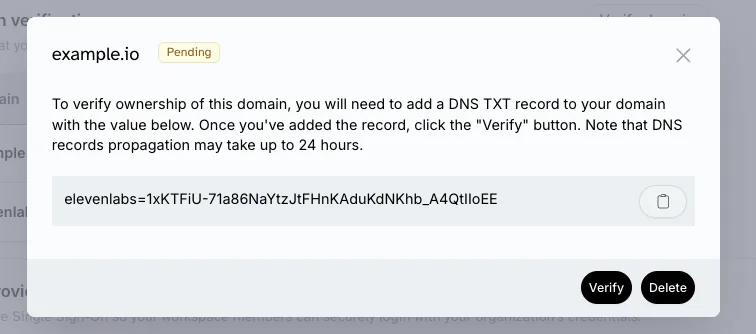
- Once the domain is successfully verified, the status of your domain will change to
Passed.
Configure SSO
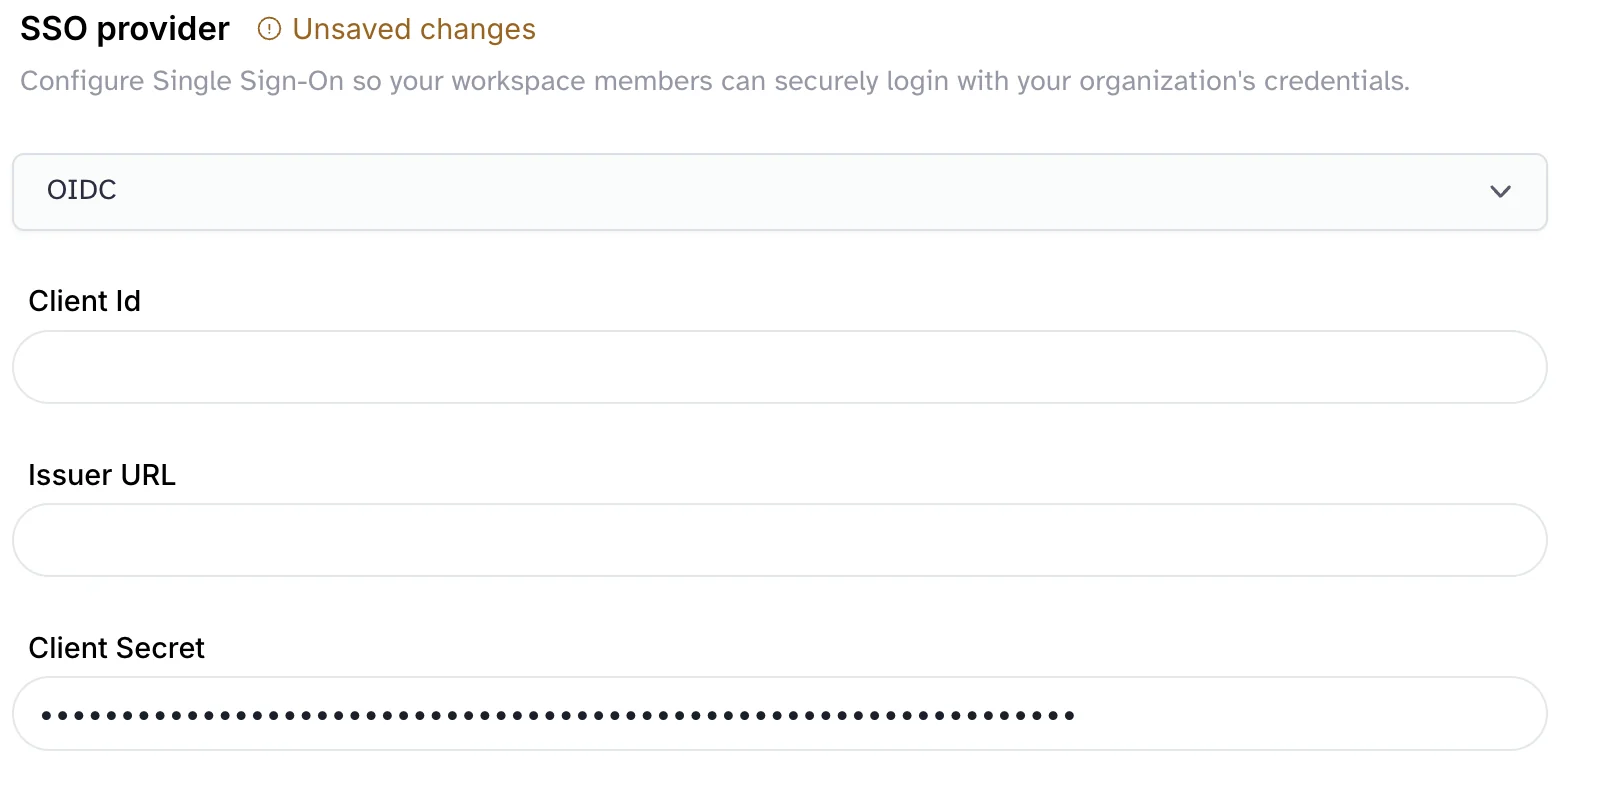
ElevenLabs support both OIDC (OpenID Connect) and SAML (Security Assertion Markup Language) for SSO. You can set up SSO for your domain by following the steps outlined below.Create an OIDC configuration
ElevenLabs OIDC integration only supports the Authorization Code Flow. To configure SSO with OIDC, you’d need:- Client Id for your application
- Client Secret for your application
- Issuer URL (The url of the authentication server)
- Redirect URL: use the greyed out link at the bottom of the SECURITY & SSO tab in Workspace Settings.
- Register an OIDC application with your identity provider.
- Add the information of required fields (Client Id, Issuer URL, etc.) to ElevenLabs SSO provider form.
- Click on
Add DomainButton and choose the domain you want to enable SSO for from the list of verified domains.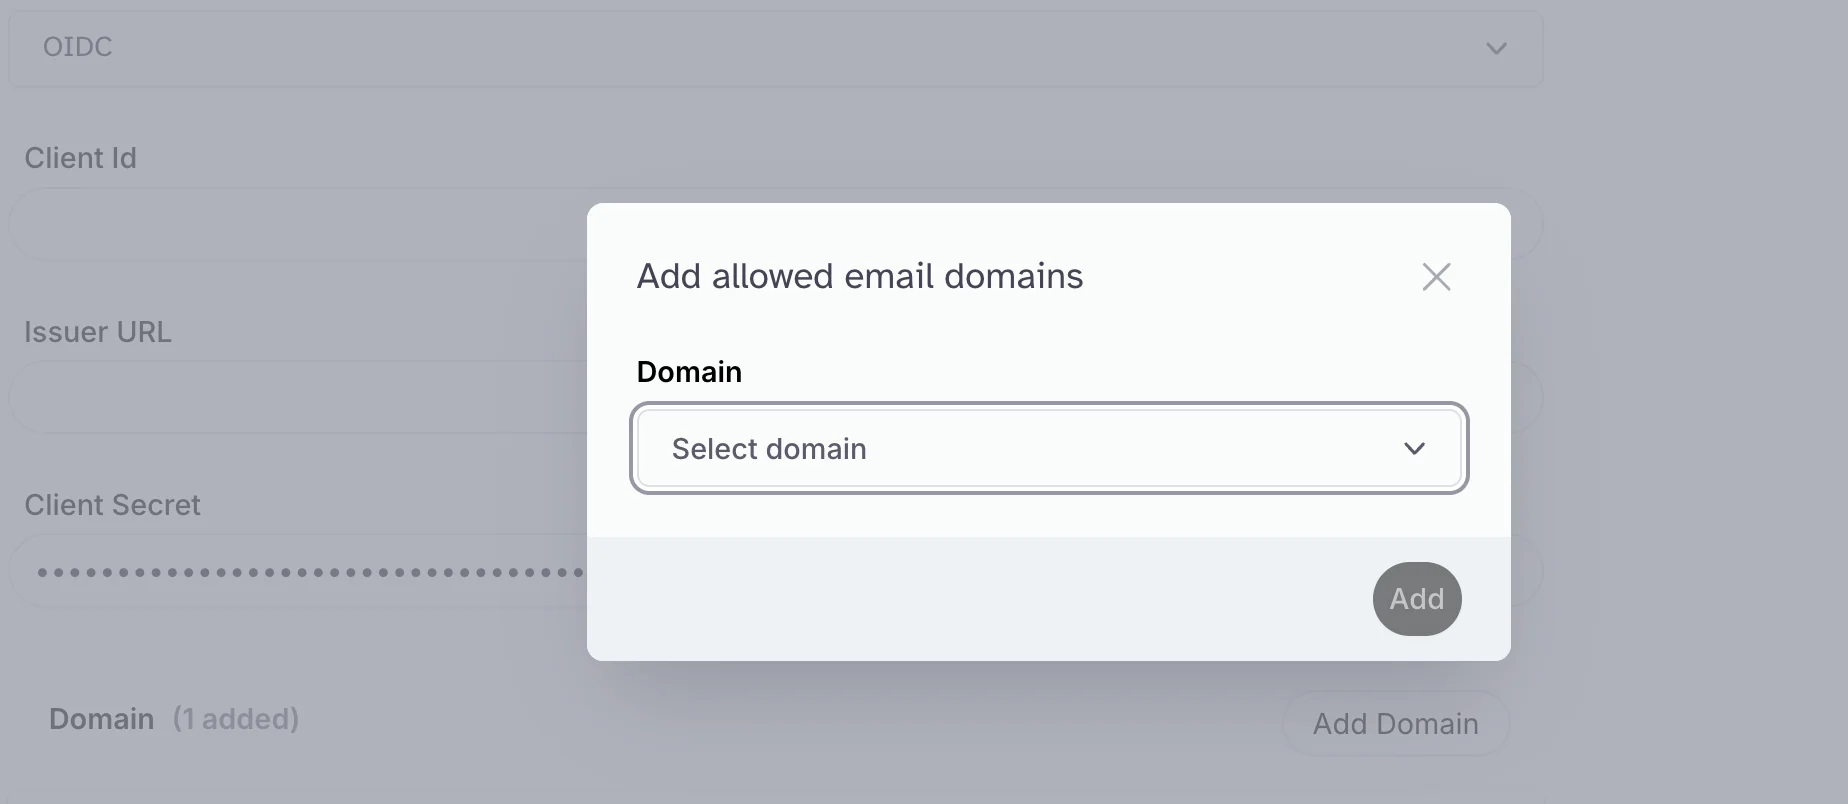
- Click on the
Update SSObutton.
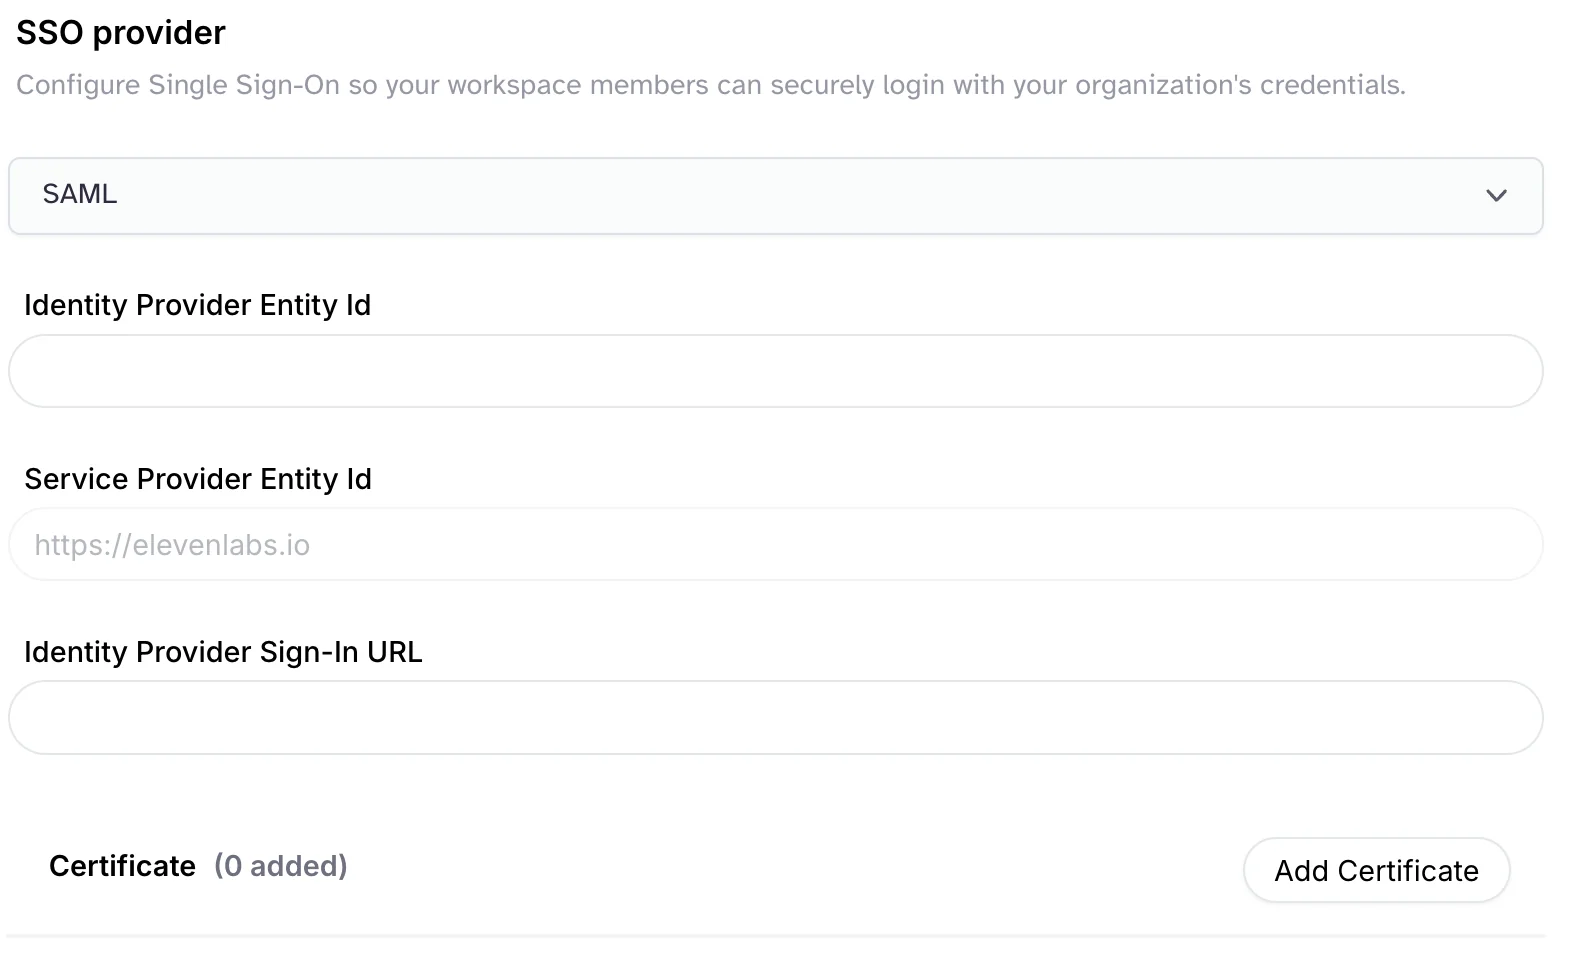
Create a SAML configuration
Only SP-initiated SSO is supported for SAML.
- Service Provider (SP): the entity providing the service. This is ElevenLabs in this case.
- Identy Provider (IdP): the entity that authenticates the user and provides the user’s identity to the SP. This is your authentication server.
- SAML request: a request from the SP to the IdP to authenticate the user.
- SAML response: a response from the IdP to the SP containing the user’s identity.
- Redirect URL: the endpoint where the SAML response is posted.
- Identity Provider Entity Id
- Identity Provider Sign-In URL (The endpoint where SAML requests are posted)
- Certificate (Digital signature)
- Service Provider Entity Id: use the value (e.g.
https://elevenlabs.io) provided in the SSO provider form in the SECURITY & SSO tab in Workspace Settings. - Redirect URL: this is the endpoint where the IdP sends the SAML response; Use the greyed out link at the bottom of the SECURITY & SSO tab in Workspace Settings.
- Register a SAML application with your identity provider; fill in required fields (SP entity id, redirect URL).
- Add the information of required fields (IdP Entity Id, IdP Sign-In URL, etc.) to the ElevenLabs SSO form.
- Click on
Add DomainButton and choose the domain you want to enable SSO for from the list of verified domains. - Click on the
Update SSObutton.
FAQ
Microsoft Entra Identifier (or Azure AD) - SAML What shall I fill for Identifier (Entity ID)?- Use Service Provider Entity Id
- Use Redirect URL
- Same as Assertion Consumer Service URL
- Use Microsoft Entra Identifier for IdP Entity ID
- Use Login URL for IdP Sign-In URL
- One known error: make sure you have
<saml:NameID>having email address as the value inside<saml:Subject>in the SAML response. We use Google Cloud as our identity platform and it expects the<saml:Subject>and<saml:NameID>elements in responses from the identity provider. If you don’t define values for these elements when configuring your provider, the SAML assertion fails.